
*We’re committed to transparency. Products marked with an asterisk were given to us to try by the brand. As always, all thoughts expressed on Rouge18 are our honest opinions.
About the Collection
OPI is celebrating their 40th anniversary by returning to its roots in Los Angeles. This year, OPI Collections is celebrating by exploring its hometown throughout its collections this year. For Summer, OPI’s latest Collection drew inspiration its favorite beach town destination—Malibu. The Malibu Collection includes 12 nail polishes with a total of three different finishes. This collection has a great mix of punchy, bold colors for summer and beachy nudes.
This week’s manicure used the neutral half of the collection with a pop of gold. Read on to see how I did it!
What You’ll Need
1. Base Coat of your choice
2. *OPI Nail Polish in “Endless Sun-ner”, “El Mat-adoring You”, “Coastal Sand-tuary”, “Bonfire Serenade”, and “Cliffside Karaoke” Nail Polishes from the OPI Malibu Collection
3. Moyra FP.08 Clear Foil Polish for Stamping
5. Blush Lacquers Matterial Girl Matte Top Coat or any matte top coat
How To
Step 1: Apply base coat to all nails to protect your natural nails and help polish adhere better.
Step 2: On each nail (one nail at a time), apply a thin coat of Moyra FP.08 Clear Foil Polish for Stamping in a swirl pattern to the center of the nail. Wait 60 or so seconds for the foil polish to become tacky. Press and remove the Moyra No. 02 Magic Foil to the tacky swirls, matte side down, until you have covered the whole design. For a tutorial on transfer foil, check out this video.
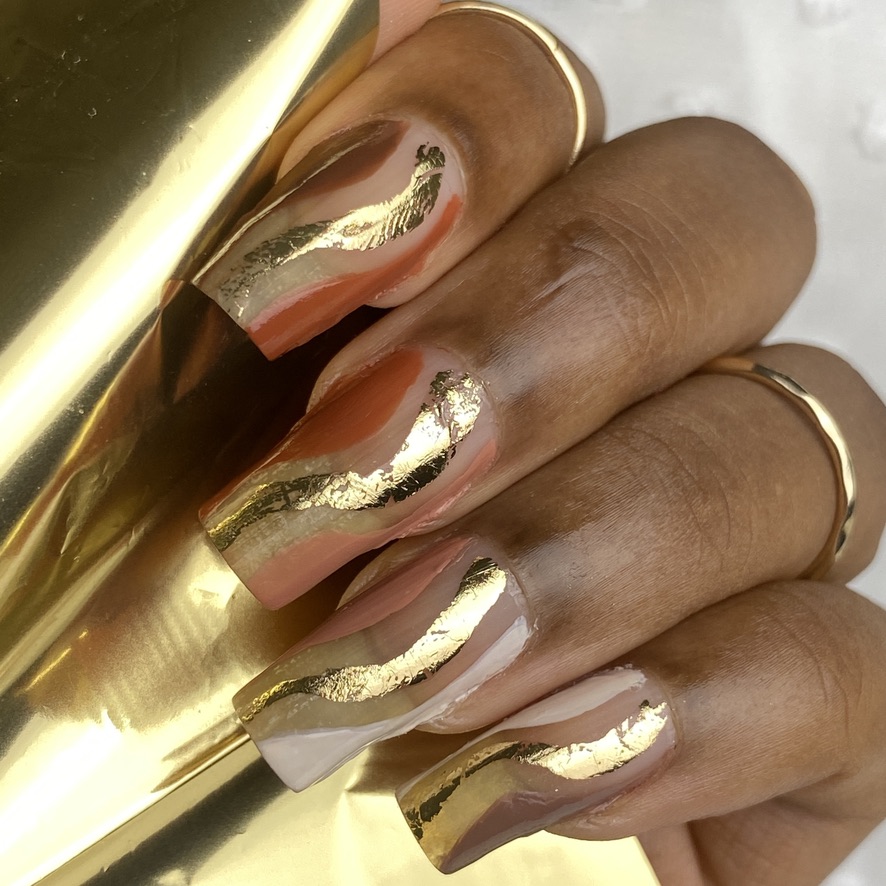
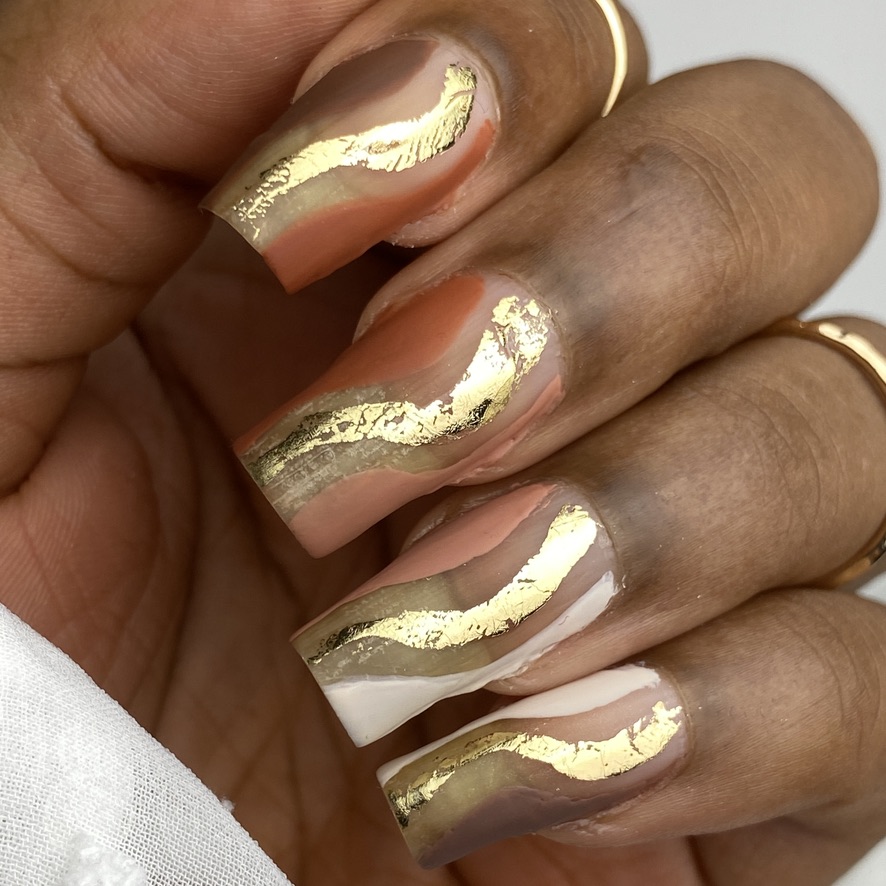
Step 3: On the thumb nail, in the same swirl pattern as the gold foil, apply OPI “Coastal Sand-tuary” to the left of the gold swirl and “Cliffside Karaoke” to the right, leaving some space between the polish and the foil.
Step 4: On the index finger nail, in the same swirl pattern as the gold foil, apply OPI “Cliffside Karaoke” to the left of the gold swirl and “Endless Sun-ner” to the right, leaving some space between the polish and the foil.
Step 5: On the middle finger nail, in the same swirl pattern as the gold foil, apply “Endless Sun-ner” to the left of the gold swirl and “El Mat-adoring You” to the right, leaving some space between the polish and the foil.
Step 8: On the ring finger nail, in the same swirl pattern as the gold foil, apply OPI “El Mat-adoring You” to the left of the gold swirl and “Coastal Sand-tuary” to the right, leaving some space between the polish and the foil.
Step 9: On the pinky finger nail, in the same swirl pattern as the gold foil, apply OPI “Coastal Sand-tuary” to the left of the gold swirl and “Bonfire Serenade” to the right, leaving some space between the polish and the foil.
Step 10: apply topcoat to the nails. Avoid putting top coat over the foil to prevent crinkling.
The Final Look
Can’t get enough? Check out more Rouge18 nail stories here!